Back Up EFS-encrypted Objects Using SYSTEM Account (code 1602)
Situation
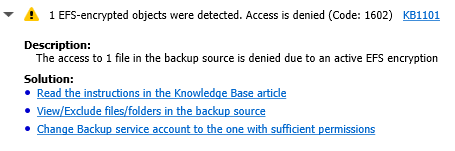
A file-level backup plan fails with the following warning message:
Solution
The issue can be solved using the SYSTEM account that accesses EFS-encrypted files. By default, the SYSTEM account does not have an EFS certificate.
If you want to use any other account, you must grant it with permissions to back up EFS-encrypted objects.
Note that allowing SYSTEM account to access EFS-encrypted files can be potentially dangerous in terms of security, since anyone with access to an instance with the SYSTEM account open, would be able to decrypt sensitive data.
Actions necessary in order to grant the SYSTEM account access to EFS-encrypted files:
- Download the PSTools.zip from the Microsoft Sysinternals website and unpack it. Place the PsExec.exe at the folder from where you can conveniently access it with the command line interface - in this example, that folder will be "C:\PsExec". To learn more about the PsExec itself, kindly refer to the PsExec 2.2 article at docs.microsoft.com.
- Open the cmd utility as an administrator.
- Navigate to the path where the PsExec.exe is located (in this example, "C:\PsExec"), and run the tool using the command psexec -i -s -d cmd.exe.
- In the opened window execute the whoami command to ensure that the newly opened command prompt window is being operated under the SYSTEM account.
- Once the above is successfully checked, execute the command echo > C:\PsExec\scratch.txt in order to create a temporary file that will be used to generate an EFS certificate for the SYSTEM account.
- Encrypt the scratch.txt temporary file using the command cipher /e C:\PsExec\scratch.txt. That operation will encrypt the file with Windows-native cipher and, as a result, will generate a new EFS certificate that is applied to the SYSTEM account.
- The EFS certificates can be managed in the Certificates MMC snap-in. To learn more about MMC snap-in tool, please refer to the article How to: View certificates with the MMC snap-in article at docs.microsoft.com.
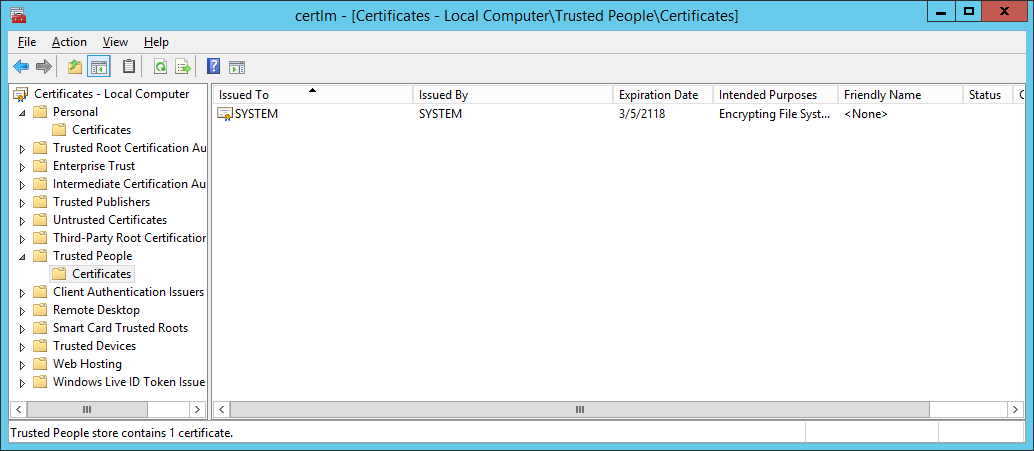
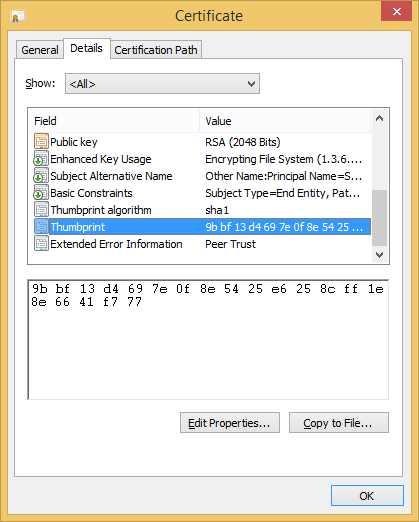
- Alternatively to the previous step, you can run the certlm.msc for certificate management. Discover the certificate issued to the SYSTEM account under the "Trusted People" tab. Copy or save the certificate thumbprint from the "Details":

- Now you can apply the EFS certificate generated for the SYSTEM account to an existing EFS-ecrypted file or folder. For that purpose, please open the cmd utility as the owner of an EFS-encrypted file/folder that you are interested in backing-up.
- Run the command cipher /adduser /certhash: with the SYSTEM account's EFS certificate thumbprint (that you copied or saved before) smushed against the colon without spaces:

To apply the command to a particular file or folder (that caused issues during the backup), use the parameters for a target filename or a target folder path, as seen on the examples below:
cipher /adduser /certhash:XXXXXXXXXXXXXXXXXXXXXXXXXXXXX filename.ext
cipher /adduser /certhash:XXXXXXXXXXXXXXXXXXXXXXXXXXXXX /s:full_directory_path
- At last, once you are done with the above procedures, please run the backup plan again. The errors concerning backing up the EFS-encrypted files under the SYSTEM account (specified as the Backup Service account) should now be mitigated.